

Learn about payment creation steps and the different stages of a payment within the Payments API platform
Create Receiving Party and Payment
sequenceDiagram
    participant EU as End User
    participant C as Client
    participant API as Reap

		alt Create receiving party before creating payment
		EU->>C: Create receiving party
    C->>API: POST /parties
    API-->>C: Return unique Receiving Party ID
    C->>EU: Recipient created successfully
    EU->>C: Create payment
    C->>API: POST /payments
    API-->>C: Return unique payment ID
    else Create payment directly
		EU->>C: Create payment
    C->>API: POST /payments with receiving party details
    API-->>C: Return unique payment ID
		end
    C->>API: Accept Quote via PUT /payments/{paymentId}/action
    API-->>C: 200 OK
    alt Approval Required
	    C->>EU: Return payment details to be approved
	    EU->>C: Approve payment
	    C->>API: Approve Payment via PUT /payments/{paymentId}/action
    end
    API->>API: Process payment
    API-->>C: Webhook triggered
    Note over API,C: "eventType": "payment"
    Note over API,C: "eventName": "payment_status_update"
    C->>EU: Notify user of successful/failed payment
There are two ways to create a payment, depending on your app’s user flow. You can either create a recipient first, or create a payment and include the recipient details in the same request. In the first approach, the user starts by creating a recipient through your application. You’ll then call POST /parties to our API, which returns a unique Receiving Party ID. When the user proceeds to make a payment, you'll include that ID in a POST /payments request. Alternatively, you can skip the separate recipient creation and directly call POST /payments, embedding the recipient details in the request body. In both cases, the API will return a unique Payment ID to track and manage the payment.
Regardless of the user journey, if you wish to obtain an indicative exchange rate before creating a payment, you can always do so can via the
GET /exchange-ratesendpoint.
After a payment is created, you must accept the quote by sending a PUT /payments/{paymentId}/action request within the validity period. Once the quote is accepted, the API will either proceed to process the payment immediately or, if approval is required, you’ll need to submit an additional approval request using the same endpoint. Throughout the lifecycle of the payment, we will trigger a payment webhook for applicable status change (note that the sequence diagram above only shows the webhook triggered for the final status update). For a more detailed explanation of the entire payment lifecycle, please refer to the section below.
Payment Lifecycle
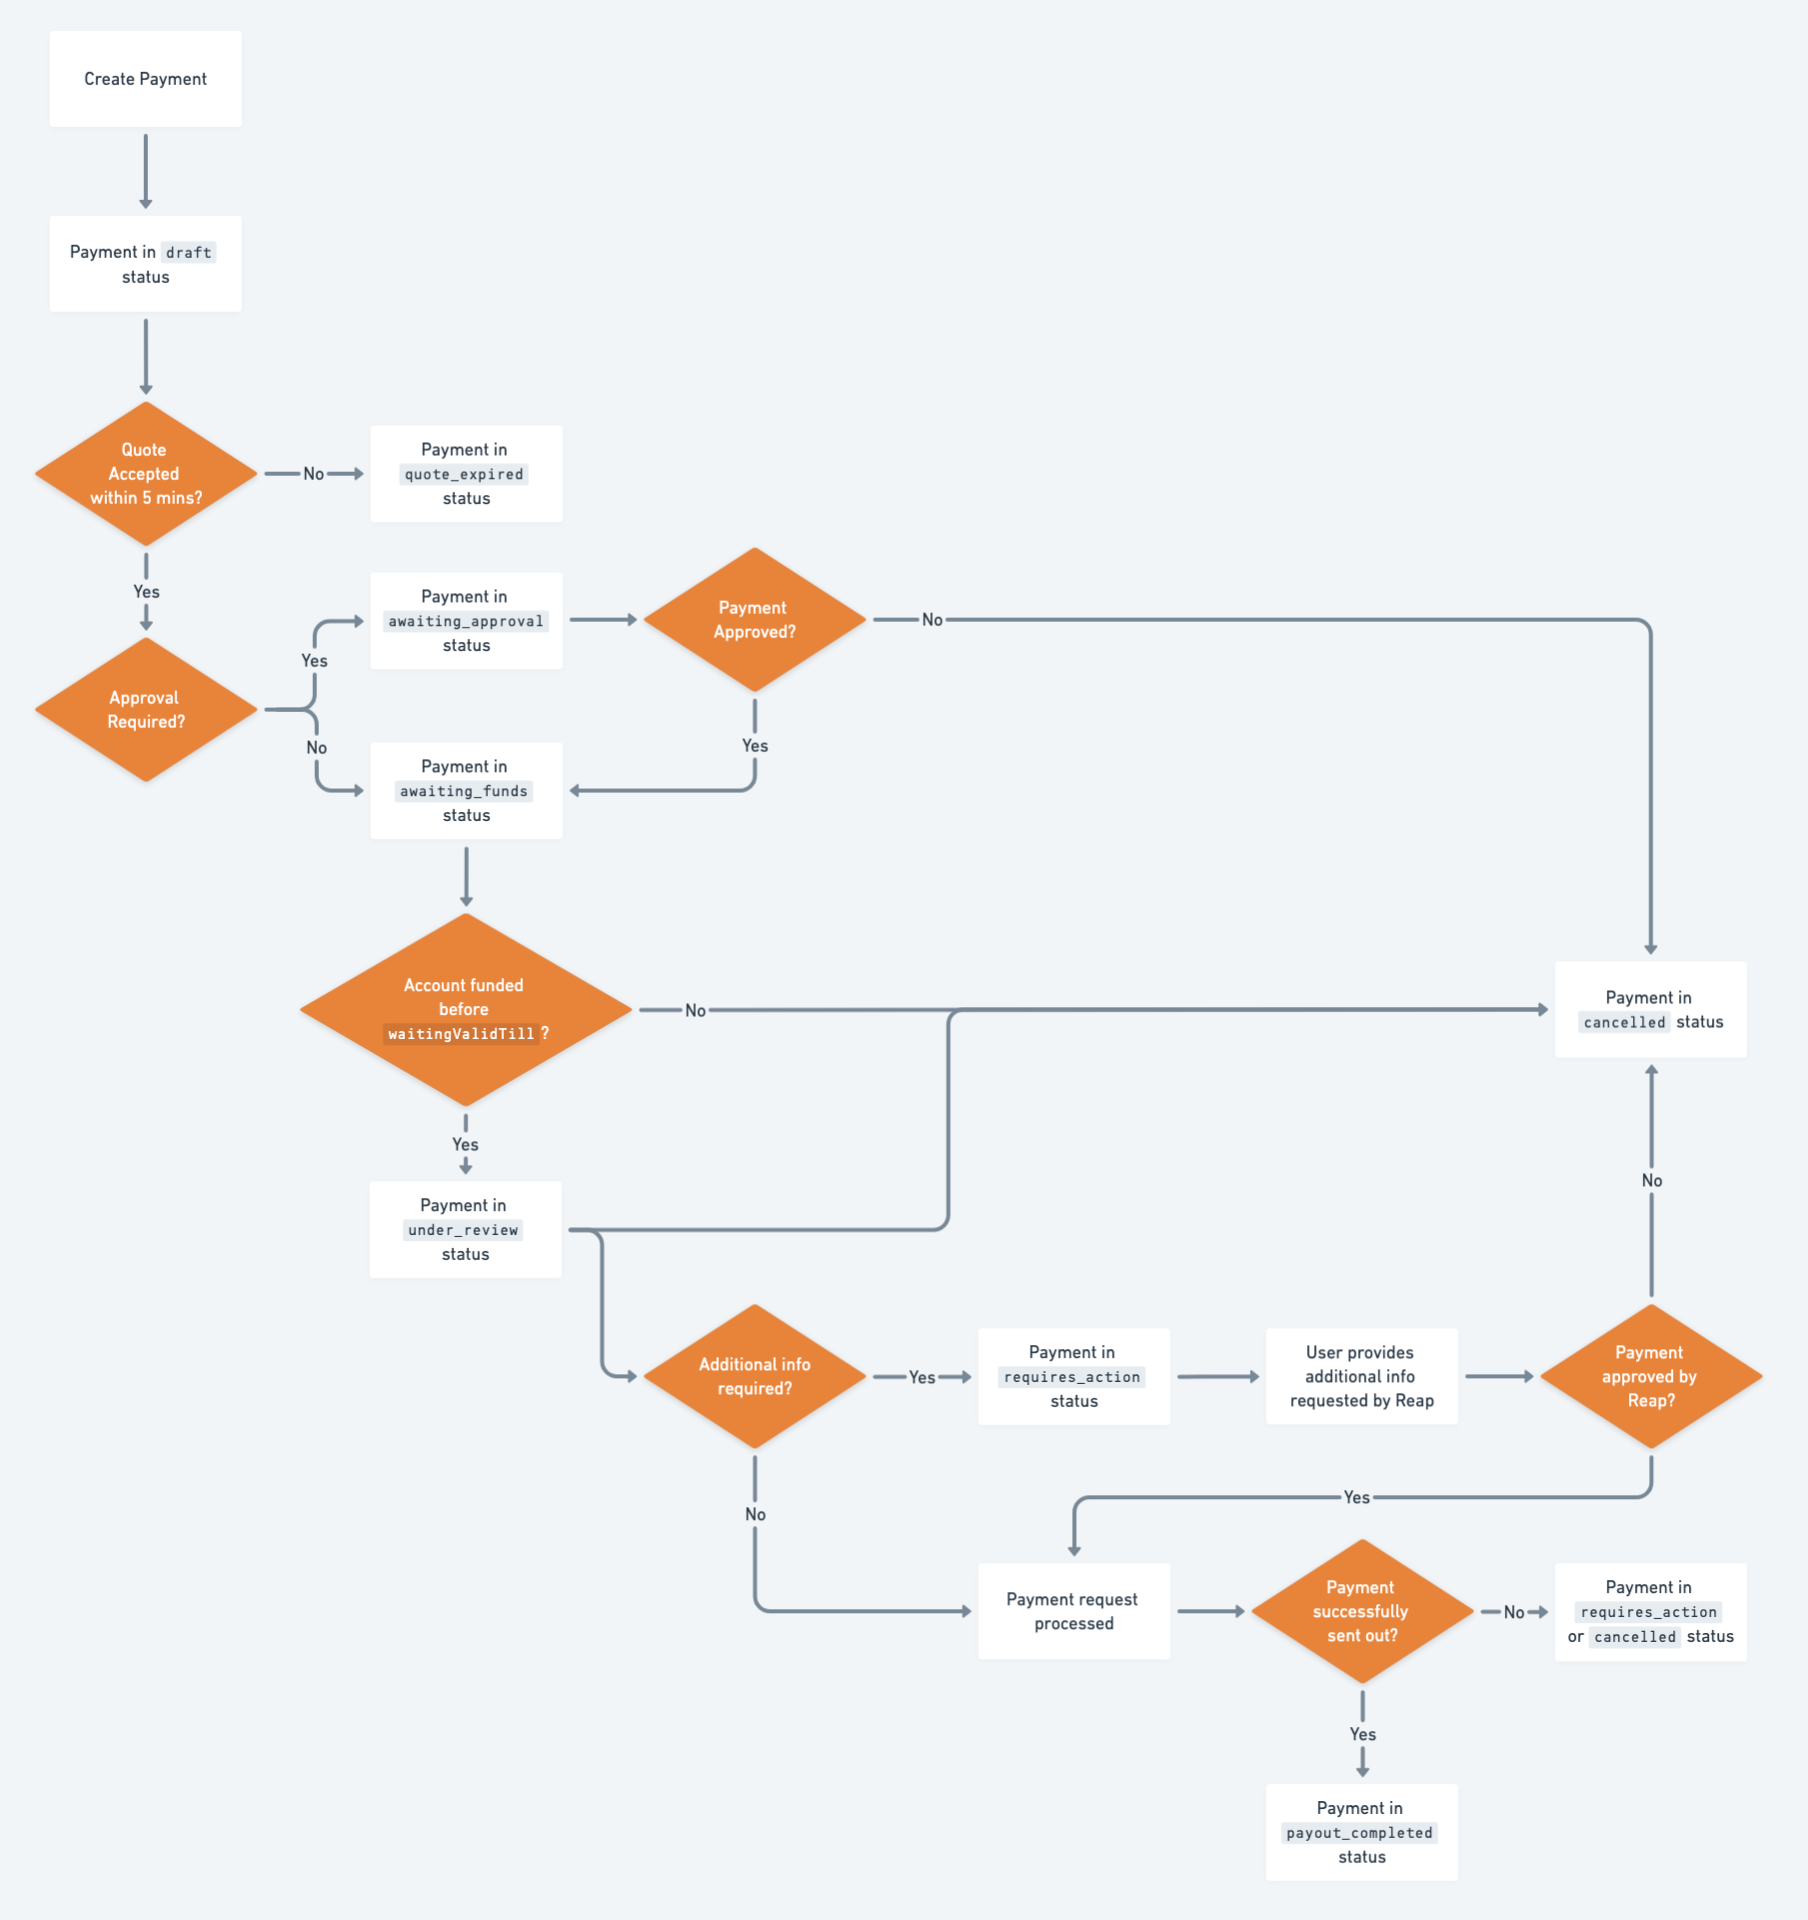
The Payment Lifecycle reflects the webhooks that are generated by the Payments API system.
- Payment is created and enters a "Draft" state.
- At this point, the payment only exists as a payment quote, and you have 5 minutes to accept it. "Draft" payments are available through the GET endpoints but won't show up in the dashboard interface.
- If you don't accept the quote within 5 minutes, the status shifts to "Quote Expired". It won't show up in the dashboard interface but is available via the GET endpoints (and can be filtered for).
- Once accepted, a payment goes to either "Awaiting Approval" or "Awaiting Funds" .
- "Awaiting Approval" happens when a payment is created with the parameter
requireApprovalturned on. This indicates to the Reap system that you want to lock-in a payment quote that is ready to be processed, but need to do an additional check on your end before we continue to process the payment. The payment can be approved or cancelled via the Action payment endpoint. - Once a payment is approved (explicitly or implicitly if
requireApprovalwas not turned on) the payment will move to "Awaiting Funds". All payments go through this status given that we do a funding check for every payment, and you will get a webhook for this status for each payment. - If there are sufficient funds, the payment then automatically moves to "Under Review". If there aren't sufficient funds, then the payment stays in this status awaiting more funding in the currency that was designated as the
senderCurrencyfor the payment. Every time you fund your wallet, we go through the queue of payments that are "Awaiting Funds" (in chronological order of when they entered this queue), and try to execute as many payments as there are funds for (e.g. if there aren't sufficient funds for the first payment, we will try the second payment in the queue, and if there are enough we will process the second payment). - Note: The validity of the payment is given in the webhook via the parameter
data.paymentInfo.waitingValidTill. Generally, we honor the payment quote given for payments in an "Awaiting" type of status until 1pm HKT the next calendar day, with the starting calendar day based on time of quote acceptance in the HKT timezone. However, this payment validity period may differ depending on thesenderCurrencyandreceivingCurrency. If the payment is still not approved AND funded by end of the payment validity, it will be automatically cancelled by our system. You will be informed of this cancellation via the payment_status_update webhook where thestatusDetailswill indicate that an expiration of the payment request had triggered the cancellation.
- "Awaiting Approval" happens when a payment is created with the parameter
- Once a payment has been approved (if applicable) and is sufficiently funded before end of the payment validity, it moves to "Under Review". Any cancellation at this point or later requires reaching out to the Reap team.
- When a payment is "Under Review" it can move on to either "Failed", "Requires Action", "Payout Completed", or "Cancelled"
- "Failed" indicates that the payment has failed or has been rejected by our provider. Reap will retry the payment where possible or may reach out for more information to rectify the payment.
- "Requires Action" indicates that Reap needs more information about the payment to continue processing it as part of the RFI process. The payment won't be advanced until the requested information is provided.
- "Payout Completed" indicates that Reap has sent the payment successfully and it's now being processed by the intermediary bank (if any) and the beneficiary bank. This status does not indicate that the funds have been successfully credited to the beneficiary.
- If a payment is in "Payout Completed" and is supported by our Payment Tracking webhook event, we will provide a tracking status and unique identifier.
- "Cancelled" indicates the the payment was ultimately cancelled and refunded.
- "Cancelled" is a final state that indicates the payment at some point was created but, whether due to a user request, the payment quote expiring, or a Reap administrative decision, was eventually cancelled during payment processing.
- "Failed" is an interim state that indicates there was an issue with the payment (e.g. due to incorrect recipient information or issues with the recipient's account). Occasionally, a payment can also be in "Payout Completed" state but then bounceback days later, where we will then transition the status to "Failed". Regardless of the scenario, the team will work directly with you to resolve the issue and the payment status will eventually be transitioned to either "Under Review", "Requires Action", "Payout Completed" or "Cancelled" state.